Access control & sharing
Categories:
Prior reading: Workspaces overview
Purpose: This document covers key considerations regarding levels of access to workspaces, and the effects of sharing and duplicating workspaces on access to workspace resources.
Access levels and privileges
There are three levels of access to workspaces and their contents: Reader, Writer, and Owner. Each level confers a different set of privileges, as summarized in the table below.
| Modify | Share | Duplicate | |
| Owner | YES | YES | YES |
| Writer | YES | NO | YES |
| Reader | NO | NO | YES |
These privileges correspond to the following capabilities:
- Modify refers to editing workspace details and creating workspace resources or apps.
- Share refers to sharing the workspace with an individual or Verily Workbench group. For more information, see Sharing a workspace below.
- Duplicate (also known as Clone) refers to making a copy of the workspace. For more information, see Duplicating a workspace below.
Sharing a workspace
You must be an Owner to share a workspace, and to see with whom a workspace has been shared. When you share a workspace with an individual or a group, you must grant them one of the access levels detailed above.
For practical instructions on how to share a workspace, see the Workspace Operations page.
Specifying an individual or a group
You can share workspaces with individual email addresses or with Workbench group addresses.
For more information about Workbench groups, see Creating and managing user groups.
The email address you use to share a workspace with someone must be the email they used to register for an account on Workbench. If you use a different email (e.g., a personal email or an alternate affiliation), the sharing request will fail.
In addition, you cannot share a workspace preemptively in anticipation that someone will register for an account. The person must already be registered for the sharing request to succeed.
Limiting workspace access with a group policy
When you create or edit a new workspace, you can specify a group policy that limits access to the workspace to a Workbench group or set of groups. Only people who are in the group will be able to access the workspace; anyone else will be denied entry, even if you have shared the workspace with them. See Creating and managing user groups for information on how to create groups.
Importantly, the group policy will be inherited by all duplicates (clones) of the workspace. This is useful for preventing "oversharing." For example, it would prevent an overly enthusiastic collaborator from unintentionally sharing their clone of the workspace (which they own and can therefore technically share) with someone who should not be granted access.
Note that the UI does not indicate any issues when sharing with a user who is not a member of the policy group. This is a security measure intended to prevent users who are not group admins from inferring group membership. Any shared-to users who are not a member of the group will not be able to actually view the workspace and will see a notification like the following:

Creating a workspace with group policy constraints
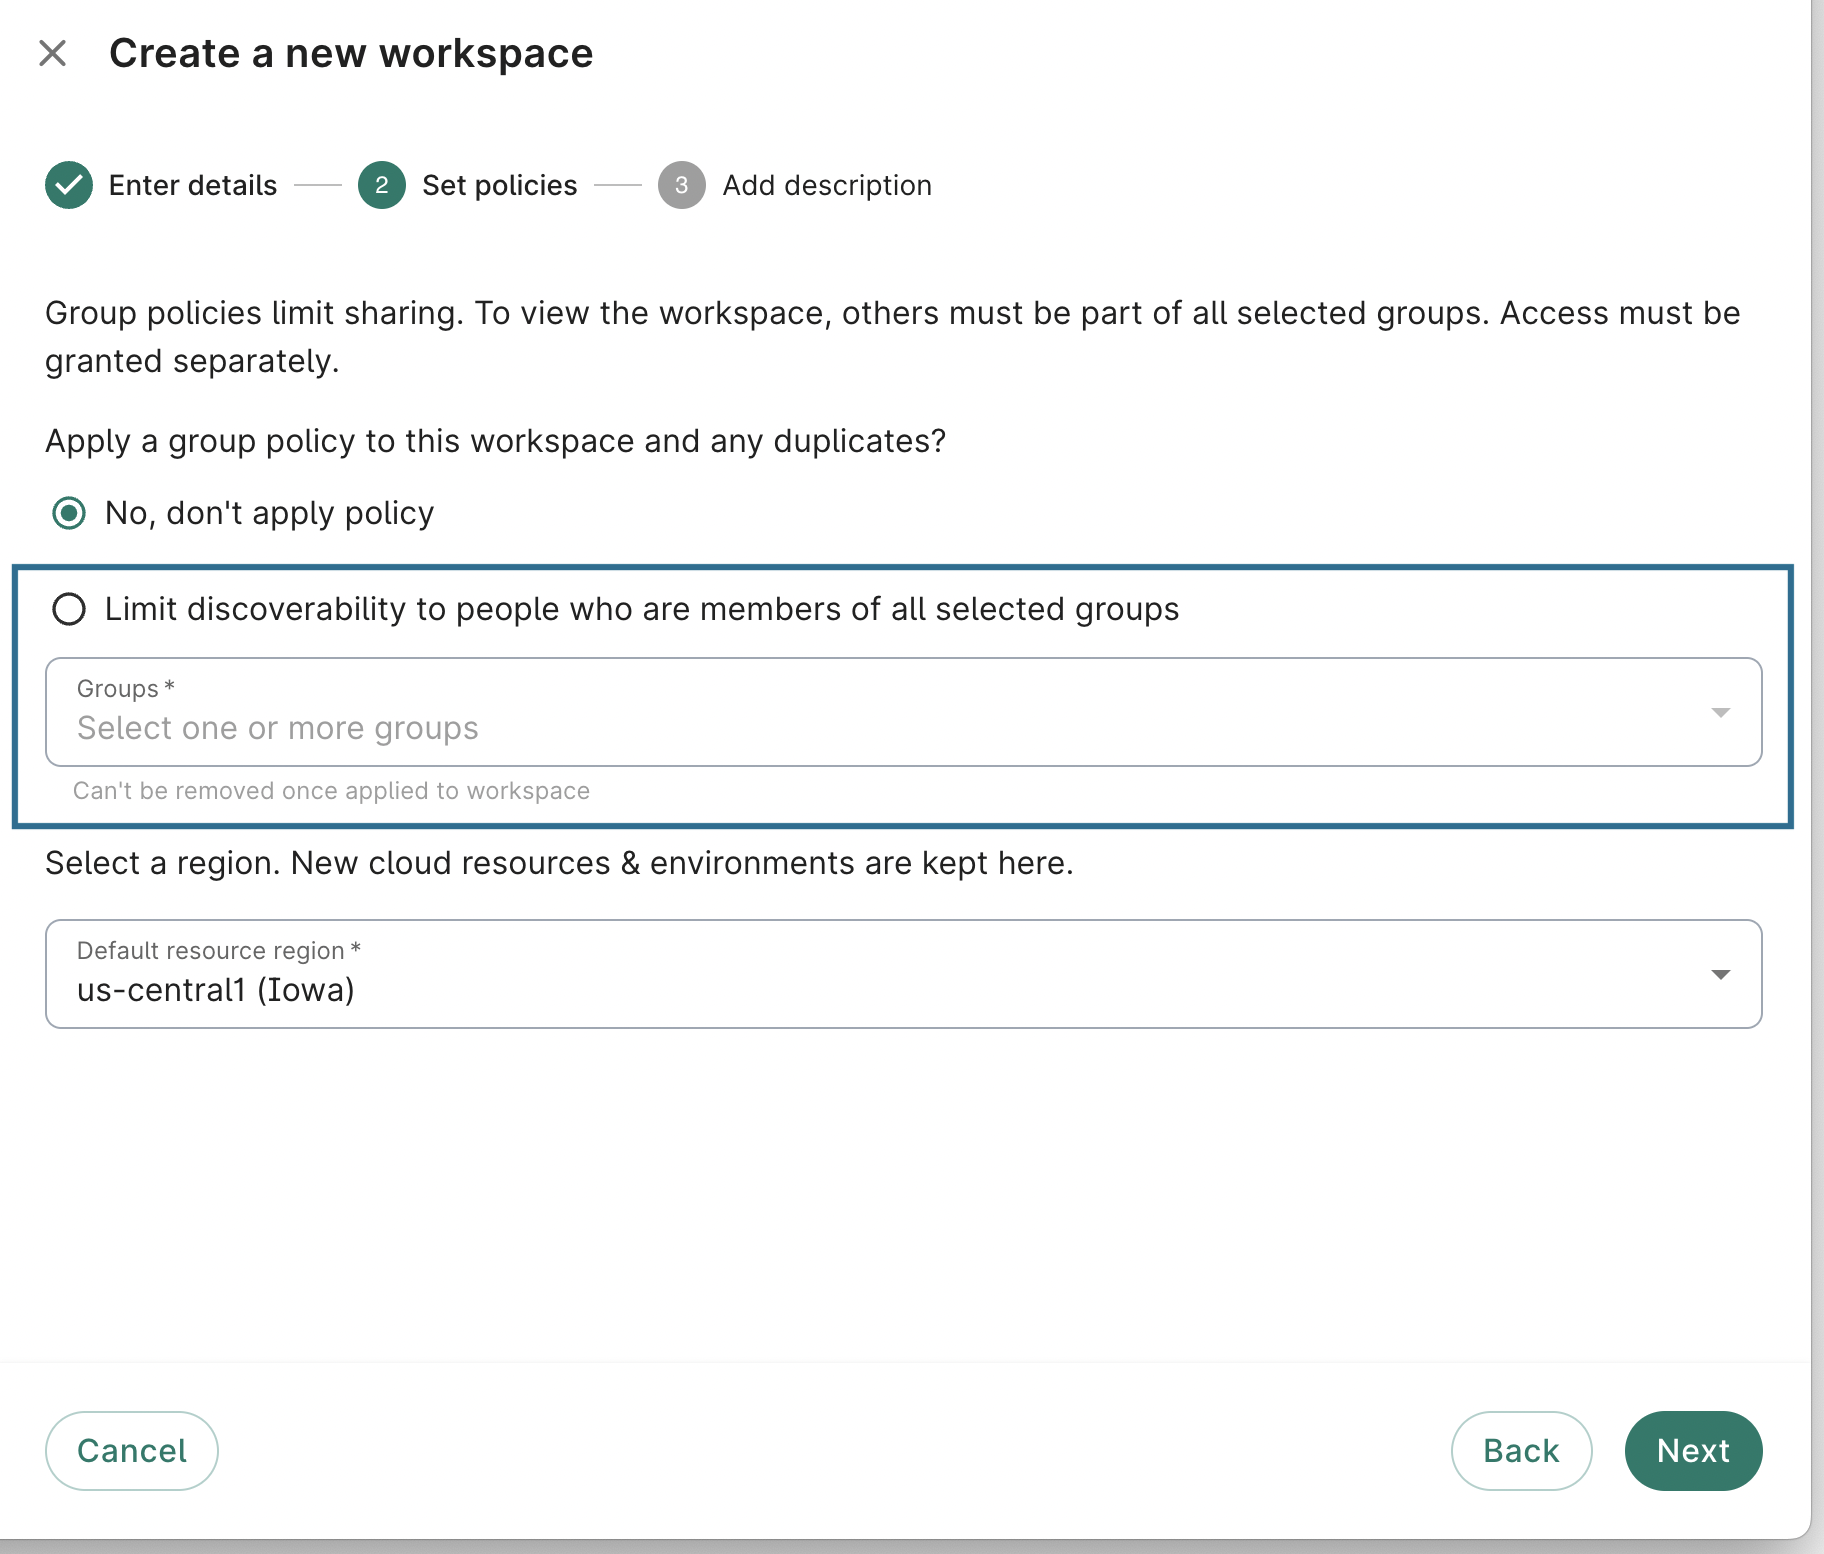
You can specify a group policy when creating a new workspace:

The Groups dropdown will list all groups that you are a member of. Select the group(s) that you want to add to the policy. Once you have added a Workbench group to a workspace policy, you may not remove it. However, group admins can add or remove people from the groups at any time, as detailed in Creating and managing user groups.
Editing a workspace to add a group policy
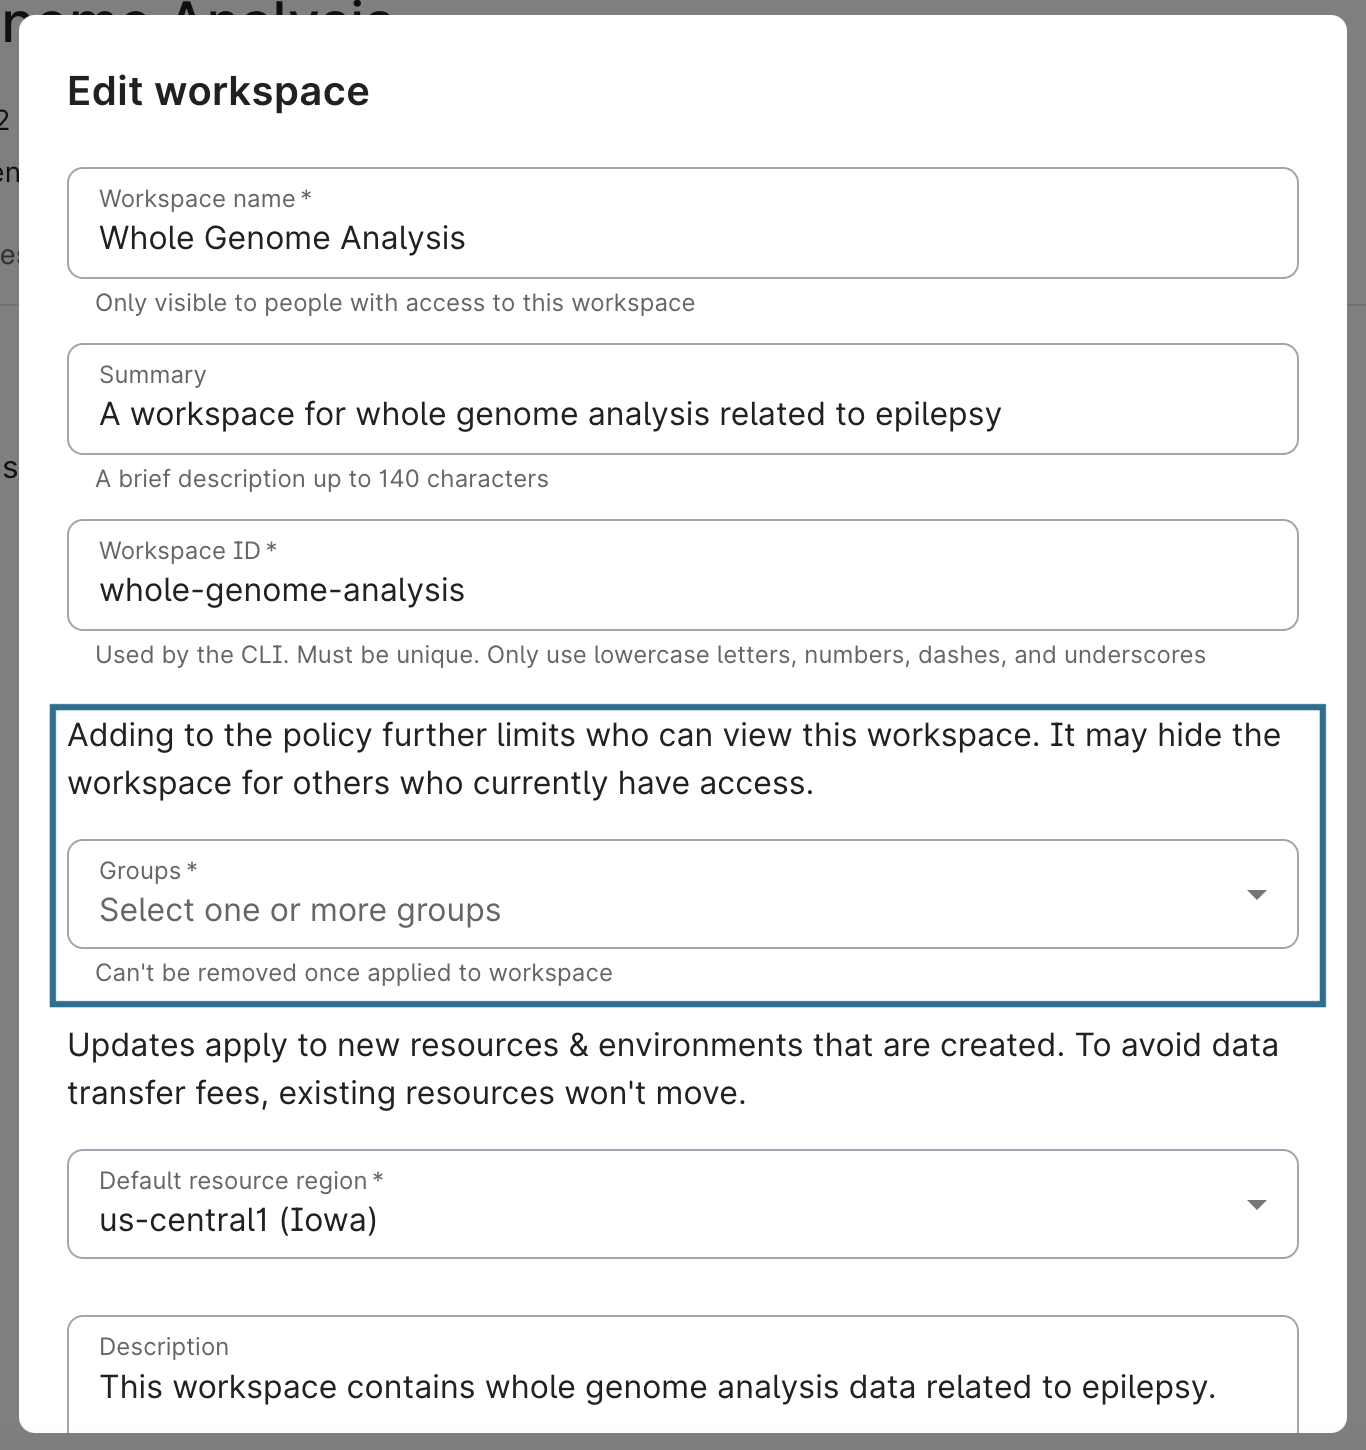
You may also add groups to a policy after the workspace has been created. Click on the workspace's Edit button:

Then, add group(s) to the workspace's policy. As is the case when creating a workspace, once you have added a group, it cannot be removed.

Cloud apps in a shared workspace
You cannot access the apps of other users in a shared workspace, regardless of your level of access to the workspace. However, if you are an Owner of the workspace, you can list all apps associated with the workspace, either in the Google Cloud console or via the command-line interface (CLI). See the Cloud Apps documentation for more detail.
Sharing workspace resources
Sharing a workspace affects access to data resources differently depending on whether they are controlled or referenced resources.
For a summary of what these are, see Data resources overview.
Sharing controlled resources
Controlled data resources are tightly associated with the workspace where they are created. They are automatically shared with any collaborators who have been granted access to the workspace, with the corresponding level of access.
In practice, this means:
- A workspace Reader will have only read access to controlled resources.
- A workspace Owner or Writer will be able to add, edit, and delete controlled resources.
Sharing referenced resources
Access to referenced data resources is not automatically granted to collaborators with whom you share a workspace. You may therefore need to grant them access to those resources manually.
The best way to manage this is to create a Workbench group to which you grant access to your referenced resources through the Google Console. Then, you can easily add users to the group from within Workbench. In addition, this is necessary for your collaborators to be able to access those resources from their apps without any additional setup work.
This is because access to resources from apps does not use your account directly; instead it is mediated through a form of proxy called a workspace service account for security reasons. Using a group to manage access brings your collaborators' workspace service accounts into play automatically.
If the external Google Cloud project has an organizational policy that imposes a domain restriction constraint, then you may not be able to add the Workbench group emails — which use the verily-bvdp.com domain — directly. Instead, create a Google Group for your organization, and add the Workbench groups as members of that group. Then, give that Google Group access to the resource in the external project.
Duplicating a workspace
All users with whom you have shared a workspace can duplicate (clone) that workspace. The resulting workspace copy (often called its clone) is owned by that user. They can create apps and add data resources in the clone even if they were just Readers of the original workspace.
Limiting access with a group policy in a workspace clone
If the original workspace has a group policy, the duplicate will inherit that policy. That cannot be changed; the policy cannot be removed nor can a new one be added.
However, if it does not, you have the opportunity to add a policy during the duplication process.
Apps in a workspace clone
The apps associated with the original will not be copied over to the clone. From that point of view, the clone is a blank slate.
Duplicating workspace resources
There are several possible ways to handle data resources when duplicating a workspace. The system has certain default behaviors (detailed further below) but you can set different options on a per-resource basis using the command-line interface (CLI).
This cannot currently be done through the web UI. The dialog window displayed when cloning a workspace will let you review —but not change— the disposition of all the resources in that workspace.
The options available are different depending on whether they are controlled or referenced resources.
For a summary of what these are, see Data resources overview.
Duplicating controlled resources
If you create a controlled resource via the Workbench
web UI, it is automatically configured with the default COPY_RESOURCE option, which means that when a user duplicates
that workspace, a copy of the controlled resource will be created in their new workspace. However, more creation options
are available via the Workbench CLI (command-line interface), and you can also modify the "cloning" setting for an already-created resource via the Workbench CLI.
The options for handling controlled resources when duplicating a workspace are as follows:
- COPY_NOTHING: Don’t clone resource.
- COPY_DEFINITION: Only used for controlled resources. Create a new controlled resource and new cloud resource with same metadata, but don’t copy any data. For example, for a Cloud Storage bucket, create a new Cloud Storage bucket with the same region/lifecycle rules as the source bucket. Files will not be copied over.
- COPY_RESOURCE (default): Only used for controlled resources. Create a new controlled resource and new cloud resource, with data copied over. For example, for a Cloud Storage bucket, create a new Cloud Storage bucket with the same region/lifecycle rules as the source bucket. Copy files from the source bucket to the new bucket.
- COPY_REFERENCE: Used for controlled and referenced resources. Create a new referenced resource that points to the same cloud resource as the source resource.
- COPY_LINK_REFERENCE: Used for controlled and referenced resources. Create a new referenced resource that points to the same cloud resource as the source resource, AND link the source workspace policy to the destination workspace policy; changes in the source will propagate to the destination.
To create a resource via the command line, use the wb resource create command with the --cloning flag set to one of the options above.
To update the cloning disposition of an already-created controlled resource, use wb resource update with the --new-cloning flag set to one of the options above.
For more details on using the CLI, see the Workbench CLI commands}} documentation.
When a controlled resource is copied when duplicating a workspace, the Owner of the new duplicated workspace owns that copied resource, which lives in the underlying project of the duplicated workspace. Note that the Owner of the duplicated workspace will incur charges for any copied resources.
Duplicating referenced resources
If you create a referenced resource via the Workbench web UI, it is automatically configured with the default COPY_REFERENCE option which determines how the resource is handled when the workspace is duplicated. However, as with controlled resources, it is possible to specify a different cloning disposition for a referenced resource.
The options for handling referenced resources when duplicating a workspace are as follows:
- COPY_NOTHING: Don’t clone resource.
- COPY_REFERENCE (default): Used for controlled and referenced resources. Create new referenced resource that points to same cloud resource as source resource.
- COPY_LINK_REFERENCE: Used for controlled and referenced resources. Create new referenced resource that points to the same cloud resource as the source resource, AND link the source workspace policy to the destination workspace policy; changes in the source will propagate to the destination.
To create a referenced resource via the command line, use the wb resource add-ref... command with the --cloning flag set to one of the options above.
For instructions on using the CLI, see the CLI documentation.
Access to a referenced resource is based on permissions on the underlying cloud resource. Duplicating a referenced resource does not change those permissions. If a user had access via the source workspace, they will have the same access via the duplicated workspace.
Last Modified: 11 December 2024